MIS 582 iLab 3 The Week 5 iLab Database Construction Using MySQL
Review the ERD below to understand the entities, attributes, primary keys, and relationships that you will create in your MySQL database.
Create a New Database
• Just like you did in the Week 1 iLab, create a new database following the naming conventions we are to use for our databases, as specified in the tutorial file Creating a Database within MySQL.pdf listed in the doc-sharing folder titled “Omnymbus Tutorial Files” in Doc-Sharing. All of our work in this iLab, will be done under this database.
Step 2: Create a New Database
• Just like you did in the Week 1 iLab, create a new database following the naming conventions we are to use for our databases, as specified in the tutorial file Creating a Database within MySQL.pdf listed in the doc-sharing folder titled “Omnymbus Tutorial Files” in Doc-Sharing. All of our work in this iLab, will be done under this database.
STEP 2: Open MySQL via Omnymbus, Create SQL File, Drop Table
• To reference, learn and apply MySQL’s own dialect of the SQL language to this iLab, browse through the file M10C_KROE8352_13_SE_WC10C.pdf in the Doc Sharing folder titled My SQL Documents.
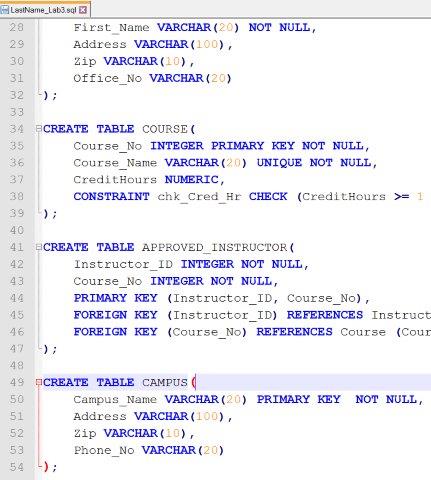
• Create a script file named LastName_Lab3.sql containing SQL statements created in Steps 3–7 below.
• But first include the following commands at the top of your script:
o SET FOREIGN_KEY_CHECKS=0;
o DROP TABLE IF EXISTS STUDENT;
o DROP TABLE IF EXISTS CAMPUS;
o DROP TABLE IF EXISTS ROOM;
o DROP TABLE IF EXISTS COURSE;
o DROP TABLE IF EXISTS INSTRUCTOR;
o DROP TABLE IF EXISTS APPROVED_INSTRUCTOR;
o DROP TABLE IF EXISTS CLASS;
o DROP TABLE IF EXISTS STUDENT_GRADE;
o SET FOREIGN_KEY_CHECKS=1;
STEP 3: Add Tables, Set Primary Keys and Foreign Keys
Add tables to the MySQL database.
• Add a table for each entity listed in the provided ERD diagram.
• Add a column for each attribute listed in the provided ERD diagram.
• Select primary key for each table as indicated in the provided ERD diagram.
• Identify foreign key relationship between tables as indicated in the provided ERD diagram.
• Enable referential integrity on the relationship.
• Enable cascade updates on the relationship.
STEP 4: Set Data Types for Table Fields
For every column in every table, update the data type as needed to enforce the domain constraints of the data.
• Dates should have a date data type.
• Surrogate keys should be auto-numbered.
• Numeric data should have a numeric data type.
• Character data should have a character data type.
STEP 5: Set Column Constraints
Back to Top
Set the following column constraints in your database.
• Student first and last name cannot be a null value.
• Course credit hours must be between one and four.
• Course name must be unique and cannot be a null value.
• Instructor first and last name cannot be a null value.
• Grade must be one of these values: A, B, C, D, F, I, W, or E. W signifies withdrawn and E signifies enrolled.
STEP 6: Add Data to Tables
Back to Top
Write INSERT statements to add at least 2–3 rows of data to each table in your database. Use any values that you like for each of the columns. Remember that you must add data to parent tables before adding data to child tables, because referential integrity is enabled.
STEP 7: Run the Script
Back to Top
• Include a COMMIT command at the end of the script.
• Include SHOW TABLES command at the end of the script, to show all tables created.
• Include SELECT statements for each table at the end of the script, to show data inserted.
• Give your script a run, by uploading into Omnymbus and executing it just like you did in iLab1.
• Paste a copy of the output in a MS Word document named LastName_Lab3_Output.
Step 8: Save and Upload to Dropbox
Back to Top
When you are done, zip up the following files to the Week 5: iLab Dropbox:
• LastName_Lab3.sql script file.
• LastName_Lab3_Output Word document.
- File Format: .sql
- Lines of Code: 174